Understanding Onyx: A Delicate Natural Stone
Onyx stands apart in the natural stone world due to its distinctive mineral composition and striking translucency, yet these same characteristics make it one of the most demanding materials to maintain. Unlike granite, which ranks around 6-7 on the Mohs hardness scale, onyx typically measures only 3-4, making it significantly softer and more susceptible to scratches and abrasions. This calcium-based stone formed through the slow precipitation of calcite in cave systems contains high porosity levels that allow liquids to penetrate quickly, creating permanent staining if not addressed immediately. Understanding these fundamental properties is essential before implementing any onyx stone maintenance routine, as treating onyx like granite or quartz will inevitably lead to costly damage.
The translucent properties that make onyx so desirable for backlit bar tops and statement vanities also create unique care considerations. Light transmission through the stone highlights every scratch, etch mark, and stain, making damage more visible than in opaque materials like marble or limestone. Additionally, the distinctive banding patterns and varied colorations found in onyx slabs mean that damage in one area cannot be easily camouflaged or blended with surrounding stone. When approaching natural stone care for onyx installations, owners must recognize that this material demands gentler handling, more frequent sealing, and vigilant monitoring compared to nearly any other countertop option.
Daily Onyx Maintenance Routine
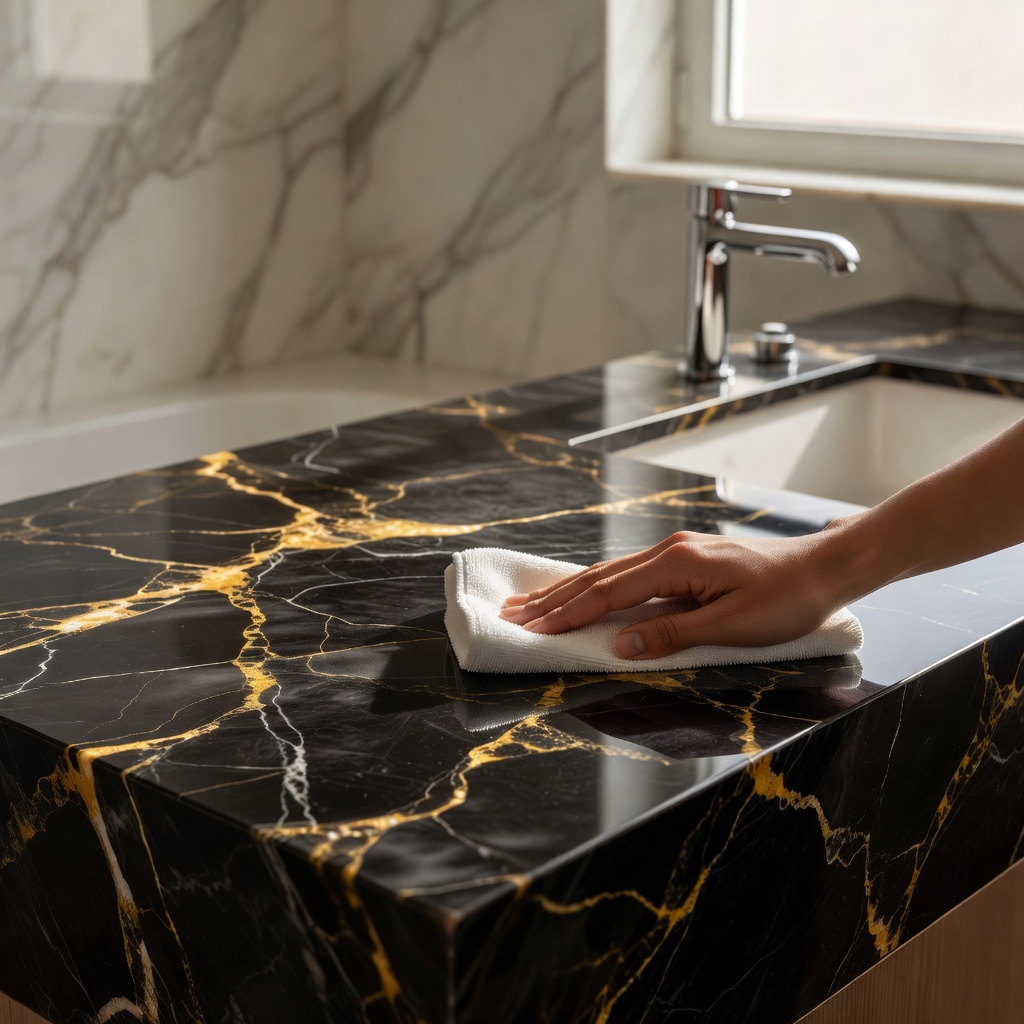
Establishing a consistent daily maintenance protocol prevents the accumulation of abrasive particles that can scratch onyx surfaces during routine use. Begin each morning by dusting countertops with a high-quality microfiber cloth, using light pressure to capture crumbs, sand, and grit without dragging these particles across the stone. Unlike cotton towels that may leave lint or trap debris, microfiber attracts dust electrostatically and lifts it away from the surface. For cleaning onyx countertops in high-traffic areas like powder rooms or kitchen islands, consider keeping a dedicated microfiber mitt nearby to encourage frequent wipe-downs throughout the day.
Immediate spill cleanup represents the most critical daily task in preserving onyx integrity. Acidic substances including wine, coffee, citrus juices, and tomato sauce can begin etching the calcite within seconds of contact, while oils may penetrate the porous structure within minutes. Keep a spray bottle filled with pH-neutral stone cleaner and a soft cloth accessible in every room with onyx surfaces to facilitate rapid response. Additionally, implement a daily inspection routine by examining the stone under different lighting angles to catch early signs of etching, dull spots, or developing stains before they require professional intervention.
Choosing Safe Cleaning Products for Onyx
Selecting appropriate cleaning agents requires understanding the chemical sensitivity of calcium-based stones and avoiding products that trigger destructive reactions. pH-neutral stone cleaners specifically formulated for calcium-based materials like onyx, marble, and travertine provide the safest option for regular maintenance. These specialized solutions typically register between 7 and 8 on the pH scale, effectively removing grease and fingerprints without dissolving the calcite matrix. When shopping for onyx safe cleaners, look for products bearing certifications from stone care associations and avoid all-purpose cleaners that may contain hidden acids or abrasives.
For homeowners preferring homemade solutions, create a gentle cleaning mixture using three drops of mild dish soap per quart of warm distilled water. Distilled water prevents mineral deposits that can accumulate when tap water evaporates on the stone surface. Never attempt to enhance cleaning power by adding vinegar, lemon juice, ammonia, or bleach, as these substances will permanently etch or discolor onyx. Similarly, avoid abrasive scrubbing powders, scouring pads, and alkaline cleaners above pH 10, which can break down the stone's crystalline structure over time. Always test new cleaning products on an inconspicuous area before applying them to visible sections of your cleaning onyx countertops routine.
Step-by-Step Onyx Cleaning Process
Proper onyx care and cleaning begins with thorough surface preparation to prevent scratching during the wet cleaning phase. Remove all decorative items, appliances, and debris from the countertop, then use a dry microfiber cloth to eliminate loose particles. Inspect the surface for any sticky residues or dried spills that might require pre-treatment with a plastic scraper held at a 45-degree angle. Never use metal scrapers or putty knives, as these will gouge the soft stone surface.
Apply your chosen pH-neutral cleaner using a soft, non-abrasive sponge rather than scrub brushes or steel wool. Work in gentle circular motions across small sections, applying minimal pressure to avoid wearing away the stone or disturbing the sealant layer. For textured or honed finishes, use a soft-bristled brush specifically designed for natural stone to reach into pores without scratching. The drying protocol proves equally important as the washing phase; immediately buff the surface dry using a clean microfiber towel to prevent water spots and mineral deposits from forming. For large installations, work in sections to ensure no standing water remains on the surface for more than a few minutes. This methodical approach to how to clean onyx preserves both the aesthetic beauty and structural integrity of your investment.
Removing Stains from Onyx Surfaces
Effective onyx stain removal begins with accurate identification of the staining agent, as different substances require specific treatment protocols. Oil-based stains from cooking grease, cosmetics, or lotions typically create dark spots that remain relatively close to the surface, while organic stains from coffee, tea, or fruit may penetrate deeper and lighten over time. Metallic stains from rust or copper create distinctive orange or green discolorations, and biological stains from mold or mildew require antimicrobial treatment alongside stain extraction. Understanding these categories helps determine whether to apply a poultice or seek immediate professional assistance.
Create a poultice for deep stain extraction by mixing a cup of baking soda with hydrogen peroxide to form a paste the consistency of peanut butter. For oil-based stains, substitute acetone or mineral spirits for the hydrogen peroxide. Apply the poultice in a layer approximately one-quarter inch thick, extending one inch beyond the stain perimeter, then cover with plastic wrap taped at the edges. Allow the poultice to dry for 24 to 48 hours, during which it will draw the stain out of the stone. Remove the dried material with a plastic scraper and rinse with distilled water. Stubborn stains may require three to five repetitions, but if no improvement appears after the second application, contact a stone restoration specialist. This patient approach to removing stains from onyx prevents aggressive scrubbing that could worsen the damage.
Sealing and Protecting Your Onyx Investment
Given its high porosity, onyx requires more frequent sealing than nearly any other natural stone, making onyx sealing tips essential knowledge for owners. Penetrating or impregnating sealers containing fluorocarbon aliphatic resins provide the best protection, creating a hydrophobic barrier within the stone pores without creating a surface film that could chip or peel. Avoid topical sealers or waxes that merely coat the surface, as these trap moisture and create unsightly buildup on soft stones. For kitchen installations, consider using a specialized oil-repellent sealer in addition to standard water-repellent formulations.
Apply sealer using a lamb's wool applicator or soft cloth, working in overlapping strokes to ensure complete coverage without pooling. Allow the product to penetrate for 15-20 minutes, then buff away excess with a clean microfiber towel to prevent haziness. Most sealers require 24-48 hours of curing time before the surface can encounter moisture. Determine resealing frequency using the water test: sprinkle several drops of water on the surface; if they absorb within 10 minutes rather than beading, immediate resealing is necessary. High-traffic kitchen counters typically require sealing every three months, while bathroom vanities may last six months between applications.
Polishing and Restoring Onyx Luster
Understanding the distinction between honing and polishing onyx surfaces helps homeowners address dullness appropriately. Honing involves mechanically removing a thin layer of stone using diamond abrasives to eliminate etches and scratches, creating a matte or satin finish. Polishing follows honing or can be performed independently on undamaged stone to create a reflective, glossy surface that enhances onyx's natural translucency. While minor restoration can be DIY-friendly, significant damage requires professional equipment to maintain level surfaces.
Address minor etching or dull spots using a commercially available marble polishing powder containing oxalic acid or tin oxide. Mix the powder with water to create a slurry, apply to the affected area, and buff gently with a damp microfiber cloth or felt pad on a low-speed polisher. For deeper scratches, wet-sand the area using fine-grit diamond polishing pads (400-600 grit) in circular motions, progressing to higher grits (800-1500) to restore shine. However, if the damage covers large areas or involves cracks, professional onyx restoration services provide honing, polishing, and crystallization treatments that restore factory finishes while preserving the stone's delicate structure.
Preventing Damage: Critical Care Mistakes to Avoid
Preventive onyx damage prevention strategies prove far more cost-effective than restoration services. Heat protection ranks among the highest priorities, as thermal shock can cause onyx to crack or develop heat rings that permanently discolor the surface. Always place trivets, thick hot pads, or wooden cutting boards between the stone and any items above room temperature, including slow cookers, coffee makers, and serving dishes. Never transfer pots directly from stovetops or ovens to onyx countertops, even briefly, as the rapid temperature change can fracture the calcite crystals.
Scratch prevention requires vigilance regarding both decorative items and cleaning tools. Avoid placing ceramic vases, metal decorative objects, or rough-bottomed accessories directly on the stone; use felt pads or coasters under everything. When dusting or cleaning, never use paper towels, which contain wood fibers that scratch soft stone, or scrub sponges with abrasive sides. Environmental factors also threaten onyx integrity; prolonged UV exposure can fade vibrant colors in honey onyx or green onyx varieties, while excessive humidity promotes biological growth in bathrooms. Install window treatments to filter sunlight and maintain consistent indoor humidity levels between 40-60% to protect your protecting onyx stone investment for decades.
Professional vs. DIY Onyx Maintenance
Understanding the boundaries between homeowner tasks and certified stone technician responsibilities prevents accidental damage during professional onyx care decisions. Routine cleaning, daily dusting, and prompt spill cleanup fall squarely within DIY capabilities, as does applying penetrating sealers according to manufacturer instructions. Homeowners can successfully address minor water spots, light dusting scratches, and fresh stains using the techniques outlined above. However, any process involving diamond abrasives, chemical etch removers, or structural repairs requires professional expertise.
Schedule annual professional inspections to assess sealant integrity, identify early etching, and evaluate structural issues like settling cracks or seam separation. Professional services typically cost between $300-$800 for cleaning, sealing, and minor polishing, while full restoration runs $1,200-$3,000 depending on square footage. When comparing DIY versus professional onyx stone maintenance, consider that improper DIY polishing can create uneven surfaces requiring expensive grinding to correct. For high-value installations or antique onyx pieces, maintain relationships with stone restoration companies who understand the specific nuances of your particular stone variety and installation configuration.
Frequently Asked Questions
Can I use vinegar or lemon juice to clean onyx surfaces?
No, never use vinegar, lemon juice, or other acidic cleaners on onyx. As a calcium-based stone, onyx reacts violently with acids, causing permanent etching and dull spots. Always use pH-neutral cleaners specifically formulated for natural stone.
How often should I seal my onyx countertops?
Onyx requires sealing every 3-6 months due to its high porosity, compared to granite's annual schedule. High-traffic areas like kitchen counters may need sealing every 3 months, while bathroom vanities can go 6 months between applications.
Is onyx suitable for kitchen countertops?
While beautiful, onyx is challenging for kitchens due to its softness (3-4 on Mohs scale) and porosity. It scratches and etches easily from knives and acidic foods. If used in kitchens, strict maintenance protocols and cutting boards are essential.
How do I remove water spots and rings from onyx?
For fresh water spots, buff gently with a dry microfiber cloth. For stubborn mineral deposits, use a poultice made of baking soda and hydrogen peroxide, apply for 24 hours, then rinse with distilled water and dry immediately.
Can I place hot pots directly on onyx surfaces?
Absolutely not. Onyx is heat-sensitive and thermal shock can cause cracking or discoloration. Always use trivets or thick hot pads, and never place items directly from oven or stove onto onyx, even briefly.
What's the difference between caring for onyx and marble?
While both are calcium-based and acid-sensitive, onyx is significantly softer and more porous than marble, requiring more frequent sealing and gentler handling. Onyx also shows scratches more prominently due to its translucency and banding patterns.
How do I fix scratches on onyx surfaces?
Minor scratches may be buffed out using fine-grit diamond polishing pads (400-600 grit) wet-sanded gently in circular motions. Deep scratches require professional honing and polishing to restore the surface without creating dips or uneven areas.
Why does my onyx look dull even after cleaning?
Dullness usually indicates etching from acidic exposure or worn sealant. If cleaning doesn't restore shine, the surface likely needs professional honing to remove etched layers, followed by polishing and resealing to restore the original luster.